Wednesday, September 21, 2016

IR floodlights off of Landscape Lighting

So I bought a Dahua POE PTZ camera off eBay. Great camera and I'm happy with it, but it has no built in IR lights. That's a problem at night. It has much better IR sensitivity than my Hikvisions, but just not good enough.

Installing an IR flood light is easy to do. Just buy one off eBay and plug it in. But I didn't want to run extra wires and I didn't want to take up another outlet (or use a powerstrip) in my garage.

I already have some landscape lighting installed with a way overpowered power box running them since I installed LED lights recently. So I set out to run my IR floodlights off of my lanscape lighting.

This proved to be not challenging at all. You just need the right parts.


  • Infrared LED flood lights
  • Full bridge rectifier (best to get one with a heatsink)
  • A standard lanscape lighting tap
  • Various plugs and wires


The rectifier I got is a 50 amp 1000 volt one with a heatsink off of eBay for $2 with free shipping. I already happened to have some plugs that fit the terminals on it.


The lanscape lighting tap is meant to run another similar landscape cable to another part of the path/area. Or to actually tap in a light. It uses sharp prings to dig in to the cable you are connecting to, and the new cable. These work well and provide a reasonably water proofed connection. Available at pretty much anywhere that sells landscape lighting (got mine at Lowes).


So forst install a short wire to the new tap part on the tap. I used speaker wire since I didn't have any more lanscape wire to use. Then added terminals.


Then you just hook up the terminals from the tap to the AC sides of the rectifier. And hook up your cable going to the IR lights to the positive and negative sides (be sure to check and verify this before installing).


This is a temporary place to put this set up while I work on maybe designing a 3D printed enclosure for it all.


Now I can power 2 LED IR floodlights for my camera using my already installed landscape lighting that runs on 12 volts AC.

Sunday, September 4, 2016

Rope Cutter

I was looking at getting some paracord, maybe only 10 feet or so. Just because I kept needing small amounts of rope when twine simply wouldn't cut it. Well it turns out it's way more cost effective to buy in bulk for paracord. So instead or 10 or 20 feet, I bought 1000 feet in a spool.


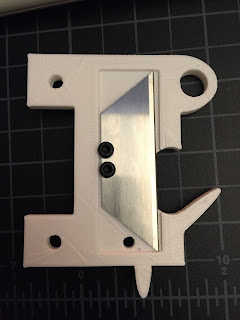
So now I had a bulky spool of rope to manage every time I wanted to cut some length. So my solution was to mount it somewhere, and have a cutting tool readily available. The problem was, I lose tools a lot. So I needed a mounted cutting tool. So off to the 3D printer. I designed a small little tool that mounts to my wooden shelves right next to the paracord spool. So now I can just pull a length and cut it real quick.


I thought ahead a little about the blade to use. Since there are two common blades relatively the same side, I designed it to accept both blades in the cutter.


So you just loop it through the hole, loop around the notches (to get tension on the rope) and then a quick wiggle against the blade to cut it. Here's the 3D stl file.


Saturday, September 3, 2016

Arduino Sensor Pod - Mock up

I got all my parts in from eBay finally (well except a 3 volt regulator pack they had to reship). So I soldered up some headers on to a mock up of the layout. I think I may put in the effort and cash to get some custom pcb's for this project. Mainly because this will be a lot of wiring if I don't and a real mess to troubleshoot if there's an issue. I like having the header pins though, makes it easy to swap out parts and move things around.


Lighting Saber

No not a light saber, a lighting saber. I needed a light above my computer desk that gave decent, broad light for when I work on projects and take pictures. So I decided to use my 3 monitor set up to my advantage. Essentially it's just a light bar that has a dimmer and is moveable.


Materials needed:
PWM dimmer (generic one that can be found all ober the place)
LED light strip (also all over the place)
8 M3 16mm bolt/nuts
A drill
3d Printed part from HERE
1/4 inch slotted aluminum bar (says for plywood)
A 12 volt power supply


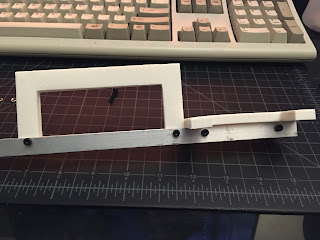
So the hardest part for this is probably getting a good 3D print and mounting those parts. All you do is print them, drill some holes, and put in the bolts like so.


After that, mount the PWM dimmer and the light stip to the bottom of the aluminum bar. The length can be easily cut to size. You may want to add additional glue to the ends and the middle to prevent the double sided tape it comes with from releasing.


Then just plug in the wires and wave around your saber. Or lean it somewhere or whatever. You get some good light now.